Sunday, February 28, 2010

A Note of Thanks


A Note of Thanks Card

Stamps
  • Bella Toile background
  • Thank You Kindly

Paper

  • Crushed Curry card stock
  • Going Gray card stock
  • Rich Razzleberry card stock

Ink

  • VersaMark pad

Accessories

  • White Stampin' Emboss powder
  • Stampin' Dimensionals
  • Mat Pack
  • Paper-piercing tool
  • Scallop Trim Border punch
  • Scallop Trim Corner punch
  • Sizzix Big Shot
  • Beautiful Butterflies Bigz die
  • Crochet thread
Instructions
  1. Stamp sentiment in VersaMark ink on Going Gray card. Cover image with White Stampin' Emboss powder, and heat emboss.
  2. Punch Rich Razzleberry card stock using Scallop Trim Corner and Scallop Trim Border punches. Cut out center of card stock to create frame, and adhere frame to card.
  3. Pierce holes in card around inside of frame using Mat Pack and paper-piercing tool.
  4. Stamp Bella Toile background image in VersaMark ink on Crushed Curry card stock. Die cut butterfly from stamped card stock using Sizzix Big Shot and Beautiful Butterflies Bigz die.
  5. Tie crochet thread around center of butterfly, and adhere to card using Stampin' Dimensionals.

Saturday, February 27, 2010

Kindness Card


This card was made using one of the great new sets that can be ordered either, clear mount or wood mount. This is one of my favorite sets from the new mini...Vintage Vogue. I love the vintage look.

Kindness Card

Stamps
  • Vintage Vogue

Paper

  • Kraft card stock
  • Very Vanilla card stock

Ink

  • Soft Suede Classic Stampin' Pad
  • VersaMark pad
  • Old Olive Stampin' Write marker
  • Rich Razzleberry Stampin' Write marker

Accessories

  • Earth Elements brads
  • Stampin' Dimensionals
  • Mat Pack
  • Paper-piercing tool
Instructions
  1. Stamp border image in Soft Suede ink along bottom of Kraft card. Tear bottom edge of card.
  2. Pierce row of holes above border image using Mat Pack and paper-piercing tool.
  3. Stamp sentiment in Soft Suede ink on card.
  4. Stamp vine image in VersaMark ink on card.
  5. Stamp leaf image in Old Olive ink on Very Vanilla card stock. Cut out, and adhere to card.
  6. Stamp small flower image in Rich Razzleberry ink and second leaf in Old Olive ink on Very Vanilla card stock. Cut out, and adhere to card using Stampin' Dimensionals.

Friday, February 26, 2010

Getting Punchy 1


Last week I offered my first punch class. We made 2 fun projects for our new 6x6 book. There are so many animals, people and ideas for our punches besides the obvious. Why not join us next time. We will be meeting on the 3rd Tuesday of the month for this fun class. The cost is $5 per page. What a bargain!

Thursday, February 25, 2010

Christmas in Our Hearts - 2


Here is the 2nd installment of the monthly Christmas in our Hearts posting. It's only 10 months away! Auggh! You say. Are you crazy? Maybe! You tell me. I love Christmas and all the doings that go along with it. I love making and sending out my cards and getting in touch with old friends, neighbors and loved ones. What better way than with a heartfelt, handmade card!


This is another Artisan Award winners card.


Stamps:
Four the Holidays
Ink:
Real Red Classic Stampin' Pad
Paper
Real Red card stock
Sahara Sand card stock
Whisper White card stock
Holiday Lounge Designer Series paper
Accessories:
Mistletoe Ribbon Originals
Linen thread
Latte Designer buttons
Playground Designer buttons
Stampin' Dimensionals
My Way punch
1/2" Circle punch
Sanding blocks
Sizzix Big Shot
Join in the Cheer Sizzlits Decorative Strip die
Lots of Tags Sizzlits die set

Wednesday, February 24, 2010

New Punches are Great!


A few features of the new punch style:
  • Low-profile, rectangular punch body allows for easier stacking and storing
  • Punches lock shut for easier storage and transport
  • Dual labels on top and end allow for easy identification and selection when stored
  • Available in three sizes: small, medium, and extra-large
  • New punches allow for larger punched images and more intricate designs while providing greater ease of use.
    • Extra -large punch images also allow for two-step designs like the Two-Step Bird punch in the Occasions Mini Catalog
  • Corner punches allow you to punch a corner design along the inside edges of a page, not just corners
  • larger, whole-hand handle design provides better leverage for easier use
  • Available in an exclusive Stampin' Up! color

Tuesday, February 23, 2010

My Basement Flooded


Ok, I am posting photos of my basement after the flood caused by a broken outdoor water pipe. It flooded the wall right where all my punches sit and my cardstock and cutter was on the table under the punches. Boy is it a mess. this is how my room looks while I am cleaning up and drying out. In the middle of all this I have a Technique class to do tonight. Now is the time to clean up, throw out and reorganize. I have my work cut out for me. Who knows how much has been lost. First I moved it all and am waiting for the drying out. Wish me luck!

Monday, February 22, 2010

Butterfly Card


Well with all the cold days and nights we had in January we finally had a great warm (60's) weekend. I could hardly wait to get outdoors and do some yard work. I was cleaning up when I noted that the hose was leaking at the faucet. I thought,"This cannot be good." Boy was I right, the hose was leaking into my basement workshop! Augh! I don't know how much stuff I lost as the clean-up will be ongoing for a week or 2.

All this to say, I will be blogging using samples from Stampin' Up! and other talented demo's. I hope you will enjoy and be kind to me while I share the works of others.

Sunday, February 21, 2010

Kissing Technique


It is still February and romance is on the hearts of so many! It is also the ending of winter here in the south and the birds are "twitterpated" as well as so many others of us! So, I thought a video on "The Kissing Technique" would be apropos today. Click here to see what Stampin' Up! has on this technique. The first sample has been "kissed" on the background and the 2nd sample has been "kissed" on the hearts.

Saturday, February 20, 2010

I Like You card


Stamps
• Love Bandit*
Paper
• Kraft card stock
• Hugs Sending Love Notes*

• Glassine rectangle envelopes*
Ink
• Old Olive Stampin’ Pad®
• Soft Suede Stampin’ Pad

• Melon Mambo Stampin’ Write® marker
Accessories
• Melon Mambo polka-dot grosgrain ribbon

• Stampin’ Dimensionals®

*From 2010 Occasions Mini Catalog

Friday, February 19, 2010

Let someone know that you are thinking of them with this cute and inexpensive gift. You can make as many as you like without breaking the bank!


Dot, Dot, Dot $9.95

Bashful Blue 8-1/2X11 Card Stock $5.50

Certainly Celery 8-1/2X11 Card Stock $5.50

Confetti White 8-1/2X11 Card Stock $9.50

Rose Red Classic Stampin' Pad $5.95

Old Olive 1/2 Inch Striped Grosgrain Ribbon $7.95

Playground Designer Buttons $7.95

Chat Room Rub-Ons $10.95

Thursday, February 18, 2010

Hearts, Hearts, Hearts


It's still February and my heart is still on a Hearty note! So, I am posting cute card made using the new stamp set I (Heart) Hearts. Remember, $2 will be donated to the Haiti crisis for every one of these sets purchased until the end of this month. Click here to order.


The colors used in this card are Chocolate Chip, Real Red, Whisper White and Pretty in Pink. Very simple, yet so very striking.

Wednesday, February 17, 2010

build-a-bear strikes again


Check out this adorable little gift for a friend or the neighborhood children. With our current economy who can afford lots of fancy, expensive gifts? Why not share the gift of a handmade card and simple gift. I promise you it will leave them begging for more!

Stampin' Up! and Build-a-Bear have joined efforts to make their products even more tempting. Then, add a few kisses and voila, a gift that is as delicious as it is cute! Click here to get all the ordering information and a direct link to my website.

Tuesday, February 16, 2010

Sale-a-Bration is Half Over


It is hard to believe but we have just hit the half-way mark for this year's SAB (sale-a-bration). It has been great so far but it could always be better. Have you had a chance yet to order and get YOUR Free stamps and punches? This year's SAB offers the most stamp sets ever offered for FREE from Stampin' Up! You are not limited to a few stamp sets but anything in the catalog that is $15.95 or less could be yours with a qualifying SAB order of $50 or more.

The card I am showcasing today was made using just some cardstock and the great stack of designer series 6x6 paper called Welcome Neighbor. The colors are bright and cheerful and the ideas are limitless.

If you want to make an order any time 24/7 just click here and order away. I hope to hear from you soon!

Monday, February 15, 2010

Another fun Valentine's Idea


A friend and relatively new stamper sent me a picture of the Valentine's she made this year. She has recently become my customer, she found me from the demonstrator website. Yea! She has twin 4 year olds and has finally found a little time to stamp. Didn't she do a great job?!! She gave me permission to post them here. Good job Valerie!

Sunday, February 14, 2010

Happy Valentine's Day


So, it is just too cold to sit in my unfinished, unheated basement and stamp! When I just have to do it, I sit on a heating pad. So, I shamelessly stole/borrowed this great project from a fellow stamper, Robin Merriman. Didn't she do a great job! If you click on her name you can see her posting about it and get all the details. I love the colors and layout. I plan to change the colors and the papers and do a card like it as soon as my fingers defrost!

Saturday, February 13, 2010

Blender Pens


One tool that is very versatile and fun to use is the Blender Pen. Stampin' Up! sells these pens in sets of 3 for 9.95. They will last a really long time. They are double-sided and can be used with a variety of products. See some of the great points about them in this article from Stampin' Up!

Features & Benefits


■ Flexible tip on each end of brush
■ 3 per package
■ Blends Stampin’ Pastels, Watercolor Pencils,Watercolor Wonder Crayons,
and Classic Stampin’ Pads

Stampin’ Quotes
“Blender pens combine the flexibility of watercolors with the convenience
of markers. It’s so easy to achieve a beautiful watercolor effect using blender
pens with just about any color source: Watercolor Pencils, Stampin’ Pastels,
Classic Stampin’ Pads, Watercolor Wonder Crayons, and Stampin’ Write
markers. And I love that the tip cleans off with just a stroke or two on scratch
paper, so I don’t have to have a different pen for each color.”

Quick Trick
To use a blender pen to create a watercolor effect, color or outline a stamped image with
Stampin’ Write markers, Watercolor Wonder Crayons, or Watercolor Pencils. Pull and blend
the colors with the blender pen. You can also dip the blender pen into Stampin’ Pastels or
Classic Stampin’ Pads and apply directly to paper.

FYI
To clean the tip, simply scribble on white paper. Discolored tips will not affect performance

Friday, February 12, 2010

A Rose is a Rose


As some of you know once a month I meet with some of the women of my church to make cards for all the birthdays and anniversaries. I design all the cards for each month and then help the ladies make them. They love to do it and even though they don't always turn out perfectly, everyone loves to get them. This is one of the cards we made last week. This is a great way to use my retired products. I used the recently retired colors of Kiwi Kiss and Riding Hood Red.

Thursday, February 11, 2010

Love Card

This is another of the great cards made by Stampin' Up! I have been in Texas and am a little behind on my own stamping. I hope to rectify that this week! This would be a great masculine Valentine.

Love card (3" x 6")
Stamps:
I {HEART} HEARTS STAMP
Paper:
Card Stock Old Olive 8 1/2X11
Card Stock Whisper White 8 1/2X11
CARD STOCK SOFT SUEDE 8 1/2 X 11
CARD STOCK CRUSHED CURRY 8 1/2 X 11
Ink
CLASSIC STAMPIN PAD RICH RAZZLEBERRY
CLASSIC STAMPIN PAD CRUSHED CURRY
Accessories:
Snail Adhesive Permanent
Brads Silver
Stampin Dimensionals
Punch 1 3/4 Inch Circle
PUNCH SMALL HEART
Instructions - Love card (3" x 6")

1. Notch right edge of Crushed Curry card stock (3-3/8" x 1/2"), and attach Silver brad. Adhere card stock to Old Olive card.

2. Stamp polka-dot heart in Rich Razzleberry ink on Whisper White card stock (2-1/4" x 2-1/4").

3. Stamp sentiment heart in Crushed Curry ink on Crushed Curry card stock, and punch out using Small Heart punch. Adhere heart to Whisper White card stock using Stampin’ Dimensionals.

4. Punch hole in center of Soft Suede card stock (2-1/2" x 2-1/2") using 1-3/4" Circle punch, and adhere to Whisper White card stock using Stampin’ Dimensionals. Adhere to card using Stampin’ Dimensionals.

Wednesday, February 10, 2010

Heartfelt Thanks Card


Today and tomorow I will be showing you a couple of great cards made by the good folks at Stampin' Up! using the new heart shaped treat cups. These hearts are a limited edition so be sure to get yours before they are gone. Click here to order from my website or drop me a line and I will order them for you with my next order.

Stamps: Sweetheart stamp set
Paper:

Bashful Blue textured card stock

Old Olive textured card stock

Whisper White card stock
Ink:

Bashful Blue Classic Stampin' Pad

Crushed Curry Classic Stampin' Pad

Old Olive Classic Stampin' Pad

Real Red Classic Stampin' Pad
Accessories:

Heart Treat Cup

Bashful Blue taffeta ribbon

Full Heart punch

Scallop Edge punchStampin' Dimensionals
Instructions:
1.Punch scallop strip from Old Olive textured card stock with Scallop Edge punch. Adhere to card.
2.Adhere strip of Whisper White card stock to card over scallop strip.
3.Stamp heart image in Real Red ink on square of Whisper White card stock.
4.Punch out center of heart image with Full Heart punch.

5.Insert Heart Treat Cup and fill.
6.Peel off adhesive cover and adhere Heart Treat Cup to card.
7.Stamp Heartfelt Thanks in Bashful Blue on card.
8.Tie Bashful Blue taffeta ribbon around card.
9.Stamp leaves and bird image in Old Olive and Crushed Curry ink on Whisper White card stock. 10.Cut out and adhere to card with Stampin' Dimensionals

Tuesday, February 9, 2010

Friend Card


Here is a cute chocolate chip "Friend" card. Speaking of choclate, I am hungry! But I digress, this is a 4x4 card that would be great for anyone. I love the colors and the simplicity.


Stamps:
I {HEART} HEARTS STAMP
TINY TAGS STAMP
Paper:
Card Stock Whisper White 8 1/2X11
Card Stock So Saffron 8 1/2X11
CARD STOCK SOFT SUEDE 8 1/2 X 11
CARD STOCK MELON MAMBO 8 1/2 X 11
Ink
CLASSIC STAMPIN PAD MELON MAMBO
CLASSIC STAMPIN PAD SOFT SUEDE
Accessories:
Punch Handheld 1/16 Inch Circle
Thread Linen
Snail Adhesive Permanent
Punch 1 1/4 Inch Circle
Stampin Dimensionals
Punch Heart-To-Heart
PUNCH JEWELRY TAG
PUNCH BORDER PINKING HEARTS
InstructionsFriends card (4" x 4")

1. Stamp dotted heart in Soft Suede ink on Soft Suede card.

2. Punch So Saffron card stock (4" x 1/2") using Pinking Hearts Border punch, and cut down to 2-1/4″ long. Adhere to card.

3. Stamp three hearts image in Melon Mambo ink on Whisper White card stock and punch out lined heart using Heart to Heart punch.

4. Stamp “Friends” in Soft Suede ink on Whisper White card stock, and punch out using Medium Jewelry Tag punch. Punch hole in top of tag using 1/16" Circle punch. Tie linen thread through hole and tie around lined heart.

5. Punch circle from Melon Mambo card stock using 1-1/4" Circle punch. Adhere heart to circle using Stampin’ Dimensionals, and adhere circle to card using Stampin’ Dimensionals.

Monday, February 8, 2010

Fun Birthday Card


I wanted to make a fun birthday card for my upcoming Birthday Stamp-a-Stack and this is what I came up with for this challenge. I used colors from the Bold Brights. It is simple and easy to do, what more could you want for a card? Check back for more details on the Stamp-a-Stack.

Sunday, February 7, 2010

Be Mine Card


Stamps
Sweetheart stamp set
Paper
Bashful Blue textured card stock
Old Olive textured card stock
Real Red textured card stock
Whisper White card stock
Ink
Old Olive Classic Stampin' Pad
Accessories
Heart Treat CupCrushed Curry polka dot ribbon
Full Heart punch Scallop Edge punch
Instructions
1. Adhere strip of Bashful Blue textured card stock to center of card.
2. Adhere to Crushed Curry polka dot ribbon to card.
3. Stamp Be Mine in Old olive ink on square of Whisper White card stock.
4. Punch out center of heart image with Full Heart punch. Insert Heart Treat Cup and fill.
5. Peel off adhesive cover and adhere Heart Treat Cup to a second square of Whisper White card stock to seal the cup.
6. Punch scallops from Real Red textured card stock with Scallop Edge punch. Adhere scallops to back of Whisper White square.
7. Adhere Whisper White square to card.

Saturday, February 6, 2010

Bunny Card


Have you ever just jumped out and said something that you regretted? I know I have and finding the right card is not easy to say I'm Sorry. I saw this stamp and loved it for its old fashioned feel and who doesn't love chocolate? I decided to stamp it then chomp its head off with the scalloped circle punch. I added the sentiment from the computer. It says..."Sorry Aout Biting Off Your Head."

Friday, February 5, 2010

Using Your Stamp-a-Ma-Jig


Everytime I show the stamp-a-ma-jig at a party or get together I get someone who says, I just don't know how to use it! Here is a great article by a fellow demonstrator.


How to Use Your Stamp-a-ma-jig
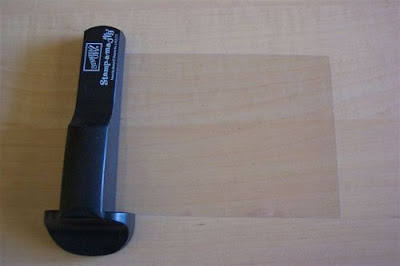
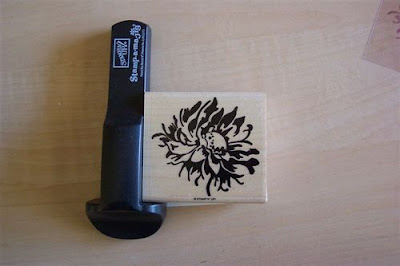
The Stamp-a-ma-jig is a wonderful tool to help you with perfectly aligned stamped images. The are several uses for the stamp-a-ma-jig including perfect placement on a project and perfect placement for two step stamping. This tutorial shows you how to use the Stamp-a-ma-jig to two step stamp a peony from Stampin' Up!'s Pretty Peony.


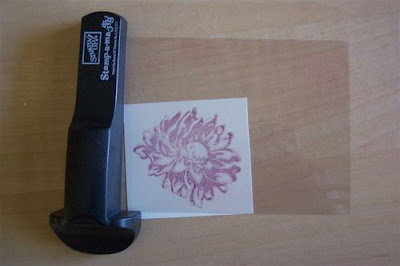
1. Lay your Stamp-a-ma-jig (SAMJ) down and slide an imaging sheet into the corner of the SAMJ.
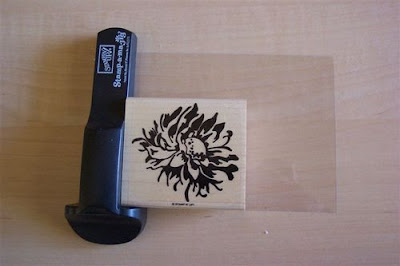
2. Ink the detailed stamp with the darker color. Hold down the SAMJ and stamp the imaging sheet, butting the stamp into the corner of the SAMJ.
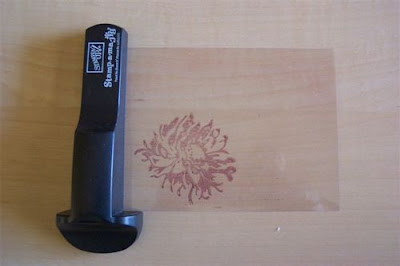
3. Carefully raise stamp. You dark detail image is now on the imaging sheet.
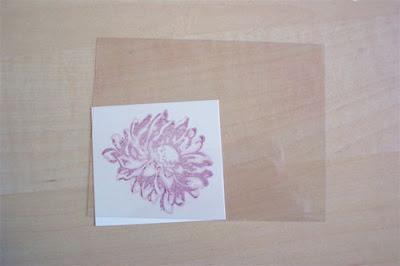
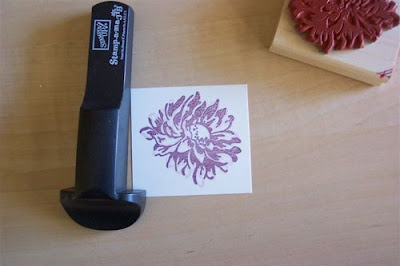
4. Stamp your bold image with a lighter color on your cardstock. Take the stamped image sheet and place it over the lighter image. Align it to where the detail stamp will lay.
5. Carefully reposition the SAMJ to the corner of the imaging sheet. Take care not to move the image sheet.
6. Hold the SAMJ in place and carefully lift the imaging sheet from the cardstock. Ink up the detail stamp with a darker color and butt it against the corner of the SAMJ. Firmly stamp onto the cardstock.
7. Remove the stamp and now you have a perfectly stamped flower with details.
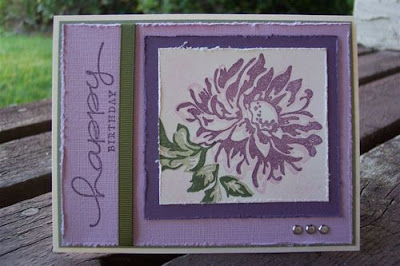
8. Finish your project as desired.


Bonus tip: Have you run out of imaging sheets? Use overhead projector transparencies! The imaging sheet used in this tutorial is actually a one quarter sized sheet of an overhead projector transparency.

Thursday, February 4, 2010

Technique Time


I have re-started my Techniques classes and I am doing 2 techniques per month. In January we did the letters A & B. I am showing the projects that we made here. These first 2 techniques are Acetate Smackin' and Blowing Bubbles.

Wednesday, February 3, 2010

Beautiful Wings Embosslit Again!


These little embosslits are so fun! I used this to CASE a card from Gretchen Barron today. I changed all the colors to make it my own. I wanted a wonderful bright card to help to get me out of the winter doldrums. I used the wonderful Color Coach tool to come up with the color combo of: Glorious Green, Brilliant Blue, Real Red, Rose Red and Crushed Curry. What do you think?

Tuesday, February 2, 2010

Happy Groundhog Day


May the groundhog not see his shadow and may we be in for an early spring! I love spring & summer! I hate, hate, hate winter! I hope you all have a great day!

Monday, February 1, 2010

Vintage Bookmark


If you know me, you know I love to read! However, I can never seem to find a bookmark. I pick up anything to hold my place! Well, I made a cute magnetic bookmark that I want to share with you today. It is 2" x 11". I scored it at 5.5". I used the VeryVintage jumbo wheel then used the friends stamp from the Vintage Vogue set. At the bottom of the bookmark is a little magnetic strip on both sides of the bookmark to make it stick around the page. The colors are T3empting Turquoise, Cameo Coral and Very Vanilla.